Loxley Group
Finished Project #24: Indian Land, SC

PHASE 1
This is the initial phase where we have conversations with our client to discuss the challenges they’re facing with their home and brainstorm solutions leveraging our design and planning team.
What challenges is our client leveraging us to solve?

-
Improve kitchen functionality by converting the existing island into a more practical square shape with a built-in trash pull-out.
-
Maximize storage space by extending cabinets to the ceiling.
-
Modernize outdated finishes with new paint, hardware, countertops, and backsplash.
-
Enhance the open-concept layout by creating a cleaner, more cohesive design.

PHASE 2
(Design & Planning)
Areas we're renovating and details we'll work on
Kitchen
-
Cabinet details
-
Hardware
-
Lighting
-
Crown molding
-
Countertop
-
Backsplash

We began with a walk-through of the home to understand the clients’ goals and assess areas for improvement. That first visit gave us the information needed to move forward with a clear, practical design plan.
Current Kitchen 1


Current Kitchen 2
We created 2D layout options to evaluate different ways to configure the space. These drawings helped us assess improvements in flow and functionality and prepared us for the next step in the planning process.

2D Proposed Layout, to help our client to visualize what we have in mind.


We met with the homeowners to review layouts, materials, and design concepts. These meetings allowed us to fine-tune the plan and make sure every choice reflected their goals for the space.
We collected inspiration images to define the style and atmosphere of the space. These visuals helped guide material selections, layout decisions, and the overall design direction.


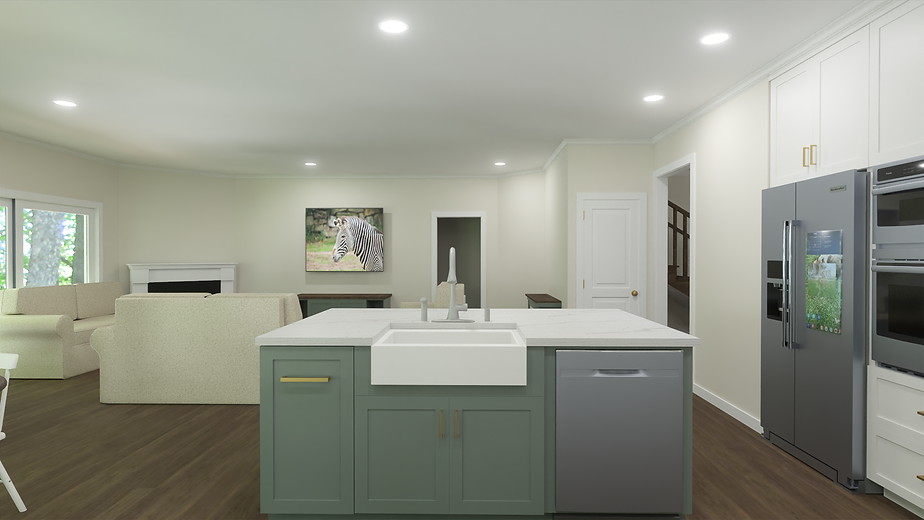
Here’s a sneak peek at the 3D layout for this kitchen renovation! The design features all-new custom cabinets, sleek countertops, and a refreshed backsplash to tie it all together.
FINAL RENDERS


PHASE 3 "CONSTRUCTION"

Kitchen Reno Kickoff
Walkthrough of the space before demo and the first steps into renovation. Watch how the kitchen starts its transformation!
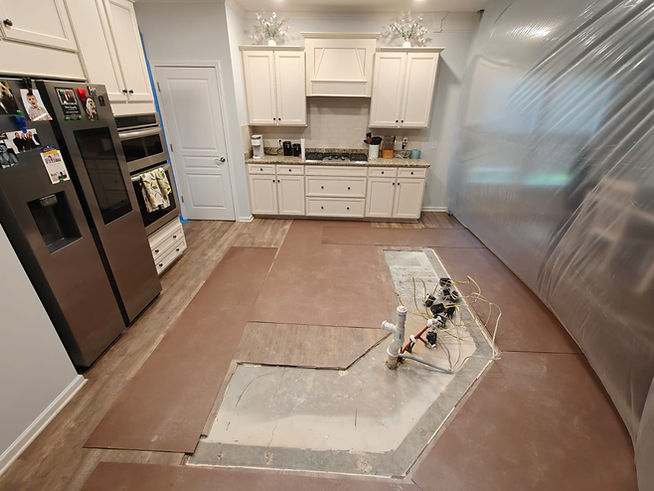
Containment Barrier Installed & Island Demolition Complete
Barrier’s up to keep the site clean, and the kitchen island has been removed

Masonite Boards Installed
Masonite laid over the floors to keep the existing surface safe during work.
Pipes stood ready for the island, and plastic sheets sealed the space midway between demolition and rebirth.


Fresh drywall and patched seams framed the wall, with wires and outlets exposed, ready for cabinets and new appliances.
New wood-look flooring was laid, with marked seams and cutouts showing where final adjustments and utilities would connect.


Flooring stretched across the room, while exposed pipes marked the island’s spot. Plastic sheeting sealed off the dining area, keeping dust at bay.
Drywall was patched smooth, with cutouts for outlets and wiring, ready to frame the new backsplash.


The wall was opened, exposing old insulation and wiring, raw layers revealed before the rebuild.
A sleek island came to life with a farmhouse sink, quartz countertop, hidden storage, and modern fixtures.


Project Walkthrough

Excited to share with you the finished project!


