Active Project #3: Davidson, NC
PHASE 1
This is the initial phase where we have conversations with our client to discuss the challenges they’re facing with their home and brainstorm solutions leveraging our design and planning team.
What challenges is our client leveraging us to solve?

-
Improve storage and layout with custom cabinetry in kitchen and living areas.
-
Upgrade flooring throughout for durability and consistency.
-
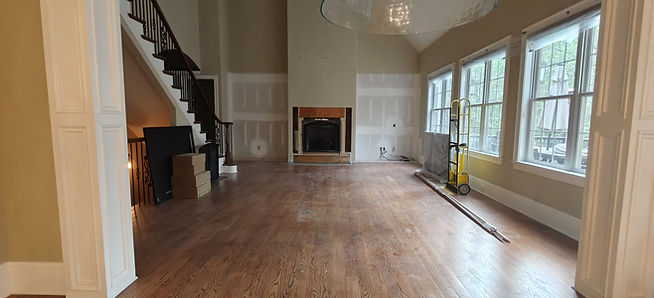
Redesign the fireplace to serve as a modern focal point.
-
Transform bathrooms to increase functionality and comfort.
-
Coordinate demolition, materials, and installations for a seamless process.
PHASE 2
(Design & Planning)
Areas we're renovating and details we'll work on
Kitchen Remodel:
-
Updated layout
-
Large countertops and island
-
New cabinetry
-
New countertop & backsplash
Family Room Remodel:
-
New fireplace location and design
-
New windows
-
Upgrade flooring
Master Bathroom Remodel:
-
New standing shower
New bathtub -
New vanity & countertop
-
New cabinetry
Guest Bathroom Refresh:
-
New vanity

During our initial visit, we walked through the home to better understand the clients’ vision and identify key opportunities. That walkthrough laid the foundation for a focused and functional design plan.
We developed 2D layout options to explore different configurations and improve flow and functionality. These drawings guided our next steps in planning.


We met with the homeowners to review layout options, materials, and overall design direction. These sessions helped refine the plan to align with their vision and priorities.
Inspiration images served as a reference point for material choices, layout adjustments, and the overall design vision.

RENDERS


PHASE 3
(CONSTRUCTION)
Kitchen demolition in progress, preparing for full renovation.

Existing fireplace removed to allow for updated design.
Primary bedroom demolition underway, making room for transformation.


On-site dumpster service supporting efficient debris removal.
Sanitation facilities set up to support a safe and efficient work environment.


Flooring materials staged for proper acclimation before install.
Painting phase in progress in the fireplace zone.


Ceiling painting in progress in the living room.
Material delivery on-site for upcoming installation.


Window installation underway for improved efficiency and design.
Water line and plumbing installation underway.


Work in progress as the project takes shape.
Hardwood flooring installed and repairs completed in the master bedroom.


Fireplace space refreshed with hardwood flooring and repair work completed.
Hardwood flooring repairs completed in the kitchen.


Appliance delivery completed for upcoming installation.
Shower plumbing and rough-in phase completed.


Bathroom subfloor done and liner installation underway for waterproofing.
Installing tile around the fireplace feature wall.


Waterproof shower liner ready for inspection approval.
Custom cabinetry installation underway in the master bathroom.


Custom cabinetry installation in progress for the kitchen range wall.
Custom mudroom cabinetry being installed.


Shower base completed and fully waterproofed.
Master bathroom cabinetry installed and ready for final finishes.


Custom fireplace cabinetry installation in progress.
Custom mudroom cabinetry installed and ready for final finishes.


Custom storage cabinetry taking shape in the laundry room.
Master bathroom shower and tub installation nearing completion.


Master bedroom flooring installation complete and ready for final touches.
New staircase with updated railings and hardwood treads.


Fireplace feature wall with custom built-in cabinetry installed.
Functional mudroom built-ins installed with custom storage solutions.

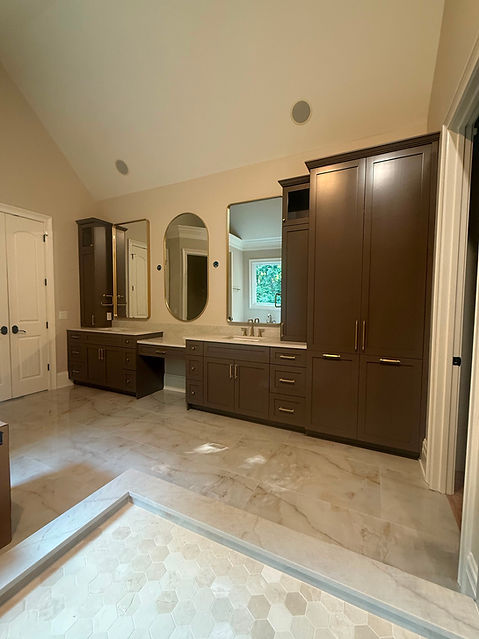
Luxury master bathroom featuring custom cabinetry and premium finishes.
Modern kitchen with custom cabinetry, waterfall island, and wood hood accent.
